Thursday, July 30, 2009

family reunion of a sort

A friend gave me this object on Saturday from his garden (along with lovely basil and rosemary). We decided it looked very much like Gonzo the Great from the Muppets, taken a Tim Burton turn. (a rather dark and scary Gonzo). I brought him to our reunion Sunday.
Our family reunion was Sunday. Kind of. My brother and his wife (c&n), my husband and I (m&s) had a lovely time with my sister and her husband (k&d). No one else came.

We sat on my sister's generous and shady porch. She trimmed negatives and put them in sleeves, N was knitting a lace shawl, and both helped me wind wool into balls and get going on an entrelac felted bag project from my stash. (My colors aren't pictured here--I'll get a photo when I can--but they're beige, tan, lt. gray, pale green and pale blue, I think--I'm only working with the tan so far.)The guys went out in the boat for a river cruise. Here they are after they've docked and are chatting in the boat.We had our usual eclectic food... I brought tortilla chips and salsa, cherries, a birthday cake (bought) for my sister, and Gonzo the eggplant, which we baked and spread onto good bread. c&n brought bean burritos and amazing brownies and a huge cabbage which is now in my 'fridge, k&d had strawberries and more chips and salsa (were we in tune or what?). So, we had a good day and a big raspberry to all the party poopers who didn't come. (so there!)

Wednesday, July 29, 2009

Finished project

My requested beads arrived from SJ Designs on Saturday, along with some other cool goodies, Thanks!, including this cool M tin stencil (for whitework). It's tiny, the M is about 1" high, I think.

I got to work right away and before I went to bed (um, mabye 2am?) I had the stocking beading complete. The stocking is also quite small (less than 2" wide at the cuff). The beading in my plan laid flatter and a bit longer. I think this is less limp because I feared the single strand of beading thread would snap if snagged so I doubled it.

Japanese Embroidery in Chicago


Coming up next month in Chicago (and, lucky for me, right in Hyde Park where I work), will be a four day workshop in Traditional Japanese Embroidery. It will be taught by Karen L. Plater and the classes will be at the Hyde Park Art Center. The class will be August 17 through 20. Pre-registration is required. Here's the flier with information.

Several years ago (at least five), I went to the Japanese Embroidery Center in Atlanta to begin phase one. I felt the experience was less than successful as far as my piece went but I learned so much that I've applied to all of my work since, I'm very happy I went. (never take an intensive class when on a new blood pressure medicine). I haven't touched my piece since the class.

I'm trying to schedule things so that I can attend the Chicago classes and pick up with my phase one piece where I left off. It's not the piece shown above, but Bouquet from the Heart of Japan, shown here. Part of my problem is I have no place where I can work on this at home. If there are enough Chicago area enthusiasts who come, we may be able to organize more frequent meetings.

Saturday, July 25, 2009

Pretty Flowers

This was a busy week, planning for the the Camp Quality evening, holding the CQ meeting, tea with a friend (Pickwick Society Tearoom in Frankfort, IL, highly recommended), our faculty/staff picnic (great grilled food) and, well, actual work that needed to be done at work (this is a very busy time of the year for me).

Sunday is our "family reunion." It's in quotes because I only know of one cousin who's coming. That's okay, we can have a nice chat, which is impossible when there's a crowd. Plus, my immediate family will be there and that is always fun.
For the last couple of weeks I've been really enjoying these flowers. They are in huge pots outside of my building. These photos are of the pot that's near the parking lot. I think they're lantana. They begin yellow and then the florets darken as they age so the center is always the lightest and the outer florets always darker. They remind me of the velvet paper posies ladies wore in the 1950s.
I didn't have time or energy for much stitching on the weeknights. I have worked some on my September challenge project for Homewood Guild. It's a rather contemplative, slow stitching project. Today was cleaning; I've been neglecting it and my allergies could tell.

Friday, July 24, 2009

We had fun!

On Tuesday night we had a class/workshop to kit up the Camp Quality project (the theme for our day at Camp is Hawai'ian Luau. We had so much fun!

We had a large group and we cut stencils, kitted perle cotton and needles, silk screened and used freezer-paper stencils to add the designs to felt for the project (more here). The painters got very creative and did used wonderful combinations of paint and felt to make really great designs.
The online tutorial I did on homemade silk screening (here and here) and the comments on freezer paper stencils formed the basis for a short class before we got going. We learned some things...

The silkscreen process is much quicker than stenciling.

You can be a bit more creative with paint when stenciling and multicolor designs are possible.

The silkscreen gets paint-logged and gets floppy, like it does when wet, and it stops working (you just get a blob of paint).

We took the floppy silkscreens and rinsed them off and set them aside to dry. I thought we were out of luck, but a clever member went and got her blow-drier and we were back in business! The drier quickly dried out the stencils and firmed them up again.

I came home with mixed feelings, like I usually do after a class. I was a bit cross (to say the least) at the beginning when I couldn't get everyone's attention. I need to have a plan for that and handle it more gracefully. Then I worried that I didn't encourage people to rotate more. The people painting were having such fun they didn't want to stop and several people didn't get a chance to try it. I knew some preferred it that way (acrylic paints do not come out of nice clothes), but I suspect others would have liked a chance. But mostly I was really happy that everyone seemed to have fun.

And, the point of the whole exercise, we got all of the needed images done and trimmed and all of the thread bags together so we're all ready for Camp Quality Illinois.

Giveaway Extension

I'm going to be away from the computer on July 31st so I'm extending the giveaway deadline unitl Monday morning, August 3d. I'm gonna be having girly fun with my sister and sister-in-law!

Thursday, July 23, 2009

Rust Dyeing Progress

Last weekend I unwrapped my pie and muffin pans to see what I got. Things had dried out a bit too much--the layers didn't allow the rain to get inside. Some things were quite wet and some not. Areas in direct contact with the rusty metal were picking up nice color but the other areas are too bare. The top photo is from one of the stacks of pie tins and below is the muffin tins.
I rewrapped them in a different configuration, stacked them back up in the back yard, and plan to water more often this week.

Wednesday, July 22, 2009

Finished Object and WIP

This weekend I put the crewel ornament together. It's hard to make myself reduce my stash when I can go dig a bit and find dark green satin for the backing, cotton batting to pad it, a length of perfect green cord just two-inches longer than required, and some nice cardboard to mount it all on.

It went together pretty quickly, once I'd gathered the materials.

I completed the stitching on this stocking a week or so ago and finally got a photo. I've been gathering materials. Crazy quilting takes a lot of stuff--little bits of it but a large variety. I have a second stocking mostly complete and a third started. I bought that star satin material in, I'm pretty sure, 1971.

I've also been working on my project for the Homewood guild summer challenge. I can't show that, however, until after the reveal at our September meeting. I am having fun doing something I've wanted to try for a while.

Tuesday, July 21, 2009

Slow Knitting

A couple of weeks ago I ran into trouble with the little lace knit sachet I was making. I ripped back a bit and started up again, but then I really looked at it and I found some more mistakes. They began to nag at me, so I ripped it all out and began over. Then, I made a mistake in the first lace row and so I started over yet again. Now I'm counting more carefully, knitting more carefully, and adding life-lines at the end of each repeat.

The lace pattern is from Knit Picks. It is the Generations Purse and I'm knitting it in Knit Picks Shinesport Cotton/Modal yarn. I must say it's taken the rip and reknit process really well and is a lovely soft yarn to work with.

I found an error in my transcription of the pattern to my flip book. I also found I have a tendency not to bring the yarn to the back after purling--which makes a nice lacy yarn over hole, not necessarily where I want one.

I haven't (yet) needed my lifelines but they're making me much calmer about knitting. I used size 8 perle cotton--you want a smooth thread that won't snag. The thread holds that row of stitches so if I rip back to that point, I will have a clear demarcation of where to stop and the stitches will be in order and properly oriented. I can then put them back on the needles and begin again from that point (rather than starting over and over).

There are two steps to adding this safety net to your knitting. The first is to add the line itself. I use a big, fat dull-pointed tapestry needle (probably a size 18) so I won't snag the yarn. I begin at one end and carefully thread it through each stitch. When I get to the end I tie the two ends of the life-line thread together so it can't pull out. I like to use a long length of thread so I can spread my knitting out on the needles to inspect it and make sure it's going okay, even with the tied lifeline. I'm sure there are other ways to do this. I know there are some knitting needles that allow you to insert a thread to add a lifeline as you knit a row.

The second part is knitting the next row. This is where I have to be more careful. You have to be sure NOT to knit the lifeline with your yarn and just let it lie there loose, between stitches. This can be hard to see when decreasing but it's crucial. If you knit the lifeline into a stitch, you won't be able to rip back if you need to.

This reknitting has changed the whole project for me. Now I can see the pattern. I've knitted it enough, I can tell from the previous row pretty much what I need to do in this row. I'm knitting much more slowly, consciously and paying much closer attention--and enjoying it much more than before. Which is most likely why I ran into trouble in the first place. I have yarn to make several of these little sachets so it's good that I've gotten it sorted out.

Friday, July 17, 2009

About the Garden

The weather is finally summery here and our garden is flourishing. A short while back I mentioned we have passion flowers and someone commented they were surprised. I don't know if they're unusual in our area or not--they came with the house. Here's the proof. They're finishing up now, but we have a couple still blooming. Each year I intend to really look at and stitch one of these wild flowers.We're THOSE neighbors. We are really encouraging milkweed because the butterflies love it. I find the plant to be fascinating, from it's multi-blossomed flowers to it's hard pods. The colors are amazing. I keep thinking it would be fun to stitch with milkweed fluff. It's very silky. I remember reading something about it being done, in haute couture in the early 20th Century perhaps. Or maybe it was used as quilt batting. I did a little Google "research" and found that milkweed fluff was used in life vests in WWI and can be spun (with difficulty). There were a couple of business sites promoting the uses of the various parts of the plant.
We have another bumper crop of oregano. It's hard to keep it from taking over. The bees and large black hornets love it. Anything for the bees.
Last, here are our tomato plants. If you look carefully you can see some tiny tomatoes. I counted six, but they're really hard to see in this photo so you'll just have to take my word for it. (They're mostly to the left or right in the center of of the photo).

Wednesday, July 15, 2009

Best Laid Plans

Well, the weekend didn't go quite as planned. Not that it was bad, just a bit more spontaneous.

I did manage to do something on each of my finishing projects. I found iron-on interfacing in my stash for the chatelaine. It's now sitting in the project bag with the chatelaine.

I found that a canning lid (the pop-off bit you can't reuse) is exactly the right size for my crewel ornament. I had one sitting by my chair that I've used for holding beads. Now that I have a right-sized template, I need to find cardboard.

And I began beading my stocking. I finished row one only to realize that I was missing a pack of beads from my well-organized project box (so much for my organization skills). I had stitched a few of the missing beads onto my plan card and used them to verify I'd written down the correct number at the SJ Designs website. Then I sent a heartfelt plea for immediate bead gratification to Susan. I'll have my beads soon and can continue.

So I switched gears. I made a new stencil screen for the Camp Quality project. We went to see the new Star Trek movie (we hadn't planned on it but a friend recommended it and we really enjoyed it). We washed my car, vacuumed it, waxed the roof and hood, washed the insides of all the windows, and scrubbed the doors with those molded pockets that collect grime and the dashboard and any plastic bits that could be washed.... and this time the "we" really meant both of us out there in the lovely weather working on it together.

I enjoyed the weather so much, I decided it was time for more rust. Upon our return from our trip to New York to see Susan in May, Marge gifted me with a bag of old rusty pans. I was, and am, thrilled.

I washed them and let them rust a bit more. Last week on my trip to Jo-Ann's I got some sale fabrics: bleached muslin, unbleached muslin and gray cotton. I got them washed on my long weekend and had them ready to go. To rust-dye fabric you need rusty things but you also need heat and water. It's supposed to be hot and rainy this week. (Finally, a good reason for hot, muggy summer weather!) This is the pile after I packaged it all up. The plastic bin has a roll of fabric layered with steel wool and wrapped with copper wire (as of this morning it was rusting nicely). I've layered the muffin and pie tins with fabric, salt, tin, fabric...with some steel wool and rusty bits from my last attempt at rust dyeing (here and here) thrown in.

I have it in the back yard, rusting away (I hope). I put the plastic tub on top of the muffin tins to keep them squashed. I'd like to get some string and tie the pie tins--I think that would provide more contact. But I haven't done it yet. (Our neighbor was out weeding as I was doing this; I'm sure he's now convinced that I'm totally nuts. He only suspected before.)

Tuesday, July 14, 2009

more silkscreen tutorial

I made a new silkscreen last weekend, for the tiki design and it came to me that I should add some notes on this process. I used regular embroidery stretcher bars a few inches larger than my design, flat thumb tacks, shipping tape and chiffon from the bridal aisle at J0-Ann's. Be sure to cut your chiffon large enough--this stuff frays like mad and you want a good grip with the tacks.

I stretched this the same way I do any fabric or canvas. Square your frame. (I usually place it in the upper corner of a door frame and whack it to match the right angle, turn it and whack again if it needs it--even if your house is older and not too square a door frame tends to stay fairly on the square and they're handy--no tools to find.)

Lay your fabric over the frame so it's even and pin the center top. Normally for embroidery I pin on the top of the frame. For this, however, I want the frame to lay flat when I put it face down on the fabric to be printed, so I pinned the tacks along the outside edge of the frame.

Check the grain and keeping it aligned along the inner edge of the top stretcher bar, pull the fabric taut and pin the center bottom. (This is more important for embroidery than this project.)
Then pin each center side. Now go back to the top and place a tack on each side of the center tack--maybe 1/2" apart. Pull the fabric taut each time. Keep going around, moving to the corners. Pin the corners last, folding the fabric (like putting on a bed sheet) and pinning it. Then I covered the tacks with tape, which helped corral some of the frayed chiffon edges.

I laid the frame fabric down on my printed design, centered it and traced the design with a fine Sharpie marker. This isn't going to affect your final design, just give you something to go by as you paint the screen.

I used Modge-Podge by Plaid for painting the design. I painted from both sides, but mostly from the front, holding the frame in my hand to make sure the wet-painted fabric side didn't touch anything.

Modge-Podge has always seemed to me to be an acrylic medium, but it dries a little harder than most. I had read somewhere it was good for this because it's more waterproof.

I used a small paint brush for details and a slightly larger one for background--just brushes I had on hand. I painted around the edges of the frame, working a bit to adhere the chiffon with this "glue" to the stretcher frame and to provide an edge for me to work with when spreading the paint.

Then I painted in the design areas I wished to block from the paint. (In this case the flower petals.) As I painted, I could see areas where the stuff covered, some areas I missed (hold it up to the light to check), and areas where the stuff pushed through to the back of the fabric (I turned it over and smoothed that out a bit). I wanted complete coverage but also fairly smooth coverage to allow the screen to lie really flat for printing.

Once I had it all painted, I set it fabric side up to dry for at least 48 hours before printing. I found a flexible squeegee (like an old credit card, a piece of flexible plastic or, if you have one, a squeegee) works best for spreading the paint for printing.

My designs for this project are fairly organic and I didn't worry about being terribly precise (which is good because I'm not good at that). I'd love to see what you do if you try this.

Saturday, July 11, 2009

Three projects nearly done!

I've been busy this week and over the last, long weekend. I stitched this beaded stocking together and added the lining this week. I'm glad I wrote up this design plan when I began it, at least five years ago. I never would have remembered that beading pattern I came up with. The stocking has been beaded and sitting in a little box with all the beads, thread, needles, the lining fabric and the design card. I must have been at a very organized point in my life! Once I bead the fringe and a hanging loop it will be done.

The local American Needlepoint Guild chapter (Ridge Needlepointers) had issued a challenge to use a men's tie in a holiday design. By the time of the challenge I wasn't doing much counted work but I liked the concept. Most people were either adapting a design pattern from a tie to needlepoint or using the tie fabric as bands or trim on a needlepoint piece. My husband found this tie while taking a walk one Sunday afternoon. It was near a couple of churches, so we're guessing someone removed his tie after church and thought he stuffed it into his pocket. The fabric of the tie was gorgeous, but it was a narrow one.

I had loads of fun selecting beads (SJ Designs) and designing the beading on the stocking and the fringe.


This is the second of two crewel projects I inherited from my friend Rita. The first, here, had some stitching done on it by Rita. This one just had the design on (very nice) twill and the stitch and thread key. I'm sure this was a practice piece for the larger piece and I'm sure Rita just jumped in on the "real" piece, bypassing the practice. It's what I would have done. The colors are the same for both pieces. It only took me a few evenings and one morning to complete (I got up early today--I just couldn't leave it unfinished.) I plan to finish it as a flat ornament and use it as a doorhanger for my door at work.

The bag that contained these two projects also has the design for a third. The third design is larger and uses more colors (these two use only two color families, a pink and a green). I'm not sure if it appeals to me enough to do it. I think I'd like to try my hand at developing my own design for the next crewel project.

This project has been lurking in the bottom of the tote I bring to guild meetings for a few years now. It's a sewing tools "chatelaine" to go around your neck and keep things handy. Once in a while I'd pull it out at a meeting and stitch a flower.

I have one much like this, bought at an antique shop already made up. This one came from another antique shop as an original kit. 1975, designed by Erica Wilson for Columbia Minerva. The threads were bright Crayola green, olive (very 1970s!), yellow, pale orange and bright orange Persian threads and medium and hot pink perle cotton. The whole design is screened in blue on a nice white cotton fabric. I finally pulled it out after guild meeting this week and completed the embroidery. It's all cut out, ready to be put together. I need to decide whether I'd like to interface the ruler band (I think yes) and find a lining for the pocket (one of the squares is stuffed for a pincushion and the other lined for a small pocket. I'm also thinking about finding a way to sew or bond that strip with the pattern information (the date is printed at one end) onto the back of the long neck piece, to document it's history.

Hopefully there will be some DONE! posts coming up soon.

Friday, July 10, 2009

More Camp Quality--tutorial

I thought I'd share more of the design images for this year's Camp Quality project (more here) and write up a bit of a tutorial. I'm going to teach this at a meeting in a week or so and it helps me to write it out beforehand.

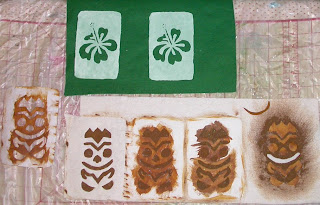
The top two images on the green were silkscreened using my homemade screen. I tacked good quality organza from J0-Ann's to a small stretcher frame, traced the design with a Sharpie, then filled in the flower petals and outer border with Modge-Podge. As I painted, the "screen" became all wavy and saggy and I didn't hold out much hope.

I let it dry 48 hours and it dried firm and straight so I gave it a go, using a small ruler as a "squeegee." I used cheap acrylics from Jo-Ann's for paint. I squirted a row of paint across the end (on the painted edge, not the open fabric) and pulled it across the open screen with my squeegee. It was partly okay--the squeegee was a bad choice but when I replaced the ruler with an old credit card, I got much nicer results--the card has some flex to it.

When I was done, I washed the screen in cool water. It got all saggy again, but tightened up nicely once dry. So, now I know I can't wash it to change colors and continue without letting it dry.

All of the rest of the imprints in the photos are made using freezer paper stencils. This is a fun technique that you can use to add images or words to anything you can paint (fill the open areas with glue and not paint and coat with gold foil). The paper works okay with felt, although it sticks much better to smooth cotton than it does to fuzzy felt.

Lay your fabric on an ironing surface right side up. Place the cut stencil, with the shiny side down. carefully on top, being sure to allow enough space for your desired margins. Press with a fairly hot iron until the plastic coating on the paper adheres to the fabric. You can't do this ahead of time and come back in a day or so to paint, but need to do it shortly before painting.

I use cheap acrylic paints and 5/$1 sponge brushes. I put some paint on an old, well washed foam meat tray (a paper plate, an old china or plastic plate, or palette paper would all work) and dab the tip of the brush into it. Then I dab the brush onto the open areas of the stencil, moving the brush up and down and not brushing it back and forth. Too much back and forth swiping and you'll pull the freezer paper away from the felt. Sometimes I'll gently swipe from the paper and onto the open fabric, but mostly it's up and down.

Don't use too much paint. Dip your brush in the paint and then tap it a couple of times on an empty area of the palette. A nice effect is to concentrate the paint around the edges of the stencil and let it fade a bit toward the center of the design area.

The row of brown tikis above are a freezer paper stencil pulled off of the design and ready to reuse; the design it was pulled from; two more stenciled designs, ready for the paper to be carefully pulled off for reuse; and a design in reverse.

For this one, I took the pieces I cut out of the stencils and carefully laid them onto my fabric in position, making sure the shiny side was down (this is important because otherwise it will stick to the iron). I pressed them into position and dabbed paint around them. I've pulled the mouth off so you can see the white fabric design that will show when the pieces are removed. I haven't tried to reuse these little bits.

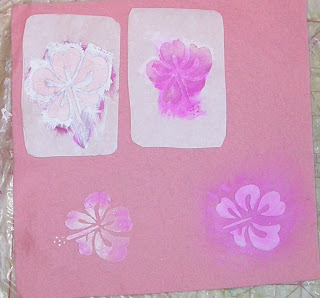
Below are flowers, done in the same technique. The top two are freezer paper stencils with the paper ready to come off. The bottom left is a finished flower with the paper removed. And the bottom right is another reverse stencil. The lighter color paper will be removed to reveal the pink ground fabric.

To make a freezer paper stencil, pull off a piece of freezer paper (the kind with plastic on one side to protect your food) large enough for your stencil and a nice margin area. For a small design like this, I whack off a piece wide enough for my narrow measurement and then cut two or three pieces across the length of paper to get cut several stencils.

I put it plastic side down onto my design. I made several photocopies of the designs to the proper size. I just place the freezer paper onto the design and cut around the lines using an X-acto knife with a fine blade. I cut carefully so I can use the cut-out bits for reverse stencils.

The layers I work on are a clipboard, a piece of cardboard to protect the clipboard, the photocopy, the freezer paper. That's it. I have always been able to see clearly the photocopied line drawing through the freezer paper without a light box.

I've found I can cut three stencils from one photocopy before it falls apart from being cut. I get a better design if I just cut rather than trying to trace the design and then cut. If you're not comfortable using an X-acto knife, then trace the design and cut it out carefully with fine paper scissors.

Have fun!

New July Giveaway

DEADLINE EXTENDED TO AUGUST 3.

The ribbon embroidery giveaway didn't pique anyone's interest, so I've pulled it. This may spark more interest. It is two charts by Dancing Needle Designs: Woodland Delight and Fruit of the Oak. Both designs are primarily cross stitch.

Woodland delight makes a sewing pocket.

Fruit of the Oak is a sampler and pillow and features a drawnwork section.


To enter, please a comment on this post by 9am central time the morning of July 31, including a way to get in touch with you.

Thursday, July 9, 2009

Holiday Weekend 2

We had a perfect day Monday--lovely weather, dry and sunny, not too cool or too hot.

I love our family get togethers. We have good times and I really like my family and being with them. As with holidays everywhere, we feasted. I have a sense that our eclectic feast is generally typical--most 4th of July feasts are made up of the traditional and favorite foods of that particular family, whatever they may be.

My brother made these baguettes and, oh, yum! N picked the wild black raspberries. I'd never had them. They are really good! Little bursts of flavor. We had cherries, too, and some strawberries. Fresh picked lettuce and herbs. Homemade tomato sauce for pasta.

I think it's probably an American law written somewhere that you have to grill for the 4th of July. We grilled chicken and brats and packets of veggies in foil went on the coals (zucchini, summer squash, onion slices, pepper slices and cherry tomatoes). Most of us had a hand in the grilling. C&N brought home grown corn (frozen from last year, but still so sweet!). We had the bread with butter, with olive oil, I added a basil leaf. My sister had made a tasty spread with cream cheese, chopped green onion (salad onions) and chopped dried cranberries. It was really good on the bread.

And our family tradition...tinned black olives. When we were kids at every family holiday meal the can of black olives would be carefully drained and served in the nice dish as a rare and expensive treat. For a really fancy dinner mom would add carrot and celery sticks and maybe some green olives and sweet pickles, but mostly the black olives were the staple.

And to this day, at every family holiday meal, one of us turns up with a can of olives to serve. With the olives, our feast was nearly complete. For my family, dessert is a main part of the meal!

I bought mini-cupcakes with poofs of icing and colorful sprinkles. My brother brought a few homemade truffles and flourless peanutbutter cookies he'd made. N showed K and me how to smush a truffle onto a cookie for a true delight. After feasting we sat around and talked (segregated, as seems to be tradition. This time the guys were on the porch and we ladies sat inside). D (in the shorts above) took us for boat rides on the river. It was perfect weather for a lovely cruise. The scruffy guy in the jeans is my sweetie. (C is off the the right out of the picture, the porch wasn't quite big enough for me to get all three into one shot.) We got our calendars out and planned our next girls day out (end of July for K's birthday!)

We drove home (it's about 60 miles) with the windows down, enjoying the perfect weather, feeling replete and very happy.

Wednesday, July 8, 2009

Holiday Weekend 1

The lovely long holiday weekend is over. It was a good time. I ran errands, did chores and shopped at Jo-Ann's on Friday (where I ran into World Embroideries and most of her family, there to get more loopers for the potholder makers). Saturday was rainy all day, but it was a nice quiet rain. I enjoyed it. I suspect all those who had picnics and parties planned were less enthused.

I pulled this pillow project from my UFO pile and stitched on it off and on over the weekend. It's no longer spring, but the umbrella fit. I also worked on the crazy quilt stocking ornaments and completed one (the picture came out too blurry to use). I worked a bit on the knitted lace sachet. Don't try to knit lace late at night when upset--it doesn't work at all well and ripping back lace isn't easy if you don't have lifelines strung. sigh... I've set that one aside for now. I used the quiet time on Saturday and Sunday to do more stenciled and silk screened felt pieces for Camp Quality (more on that later this week).

The rains stopped Saturday just in time for the fireworks. We grabbed chairs and strolled up the block to sit and watch. Our town puts on a very nice display. I absolutely love fireworks. Each year I think how so very lucky we are that these loud flashes and booms and bang engender "oohs" and "aahs" and not fear.

The big news for me this weekend was that I completed the Bayeux Tapestry piece, purchased backing fabric, and got it backed, trimmed and DONE! I dug out my limping sewing machine and put it together on Sunday. All I needed was for it to sew forward and it still does that.

The fabric it's sitting on is the leftover of the backing fabric I used, from the upholstery department. (If you need a piece let me know, I have half a yard by, probably, a yard left with no plans for it. It's a medium-weight fabric.) The wooden hanger came with it, I made a pocket on the back to hold it.

I'm rather pleased with the edge trim. I couldn't find a cording I liked and didn't want to make one from the wool thread (my usual trim), so I bought a hank of round brown leather cord from the upholstery department. I whipped it on with the dark blue wool. I also used a length of the leather to add a hanging cord to the rod.

While I had the machine out, I stitched the lining for a stocking I'd begun long ago as a holiday challenge that never made it. It now will get it's beaded fringe around the top. (Another UFO nearly done!)

On Monday we had our family get together. I'll write about that tomorrow.

Friday, July 3, 2009

R. Buckminster Fuller

image from the Encyclopedia Britannica

This week I took a bit of a trip back into my past. When I was in my twenties, Bucky Fuller was my guru and this week I visited a lovely retrospective exhibit about his wide range of work at Chicago's Museum of Contemporary Art. Sadly, the exhibit closes Sunday, so I can't encourage everyone to go.

If you've ever seen a geodesic dome, then you know of Bucky Fuller's work. Those huge buildings with the roofs suspended from poles and cables? derived from his work. Ever heard the term "Spaceship Earth"? Fuller again.

R. Buckminster Fuller lived before his time. Long ago he talked about affordable housing, sustainability, working together, feeding everyone, weaning ourselves from fossil fuels and nuclear power, working together so we can all live and prosper on this planet. Sound familiar? He was talking about these things in the 1930s and into the 80s.
A true renaissance man, he designed cars, houses, wrote poetry and prose, illustrated, drew, sketched, painted and did amazing things with three-dimensional geometrics (and much more).

I discovered him while in high school, through his dymaxion globe. A cardboard fold up globe that could be laid flat and showed the continents together without the distortion of a traditional map. My dad gave me the globe and I kept it for many years.

Later, in college, I experimented with geodesics, tensegrity, synergetics and was fascinated by his suspended modular houses and the dymaxion car. The latter were from the 1920s and 30s--way before their time. I could barely comprehend some of it in the 70s--in the 20s it must have seemed outrageous and impossible, the stuff of science fiction!

In the 70s many of his ideas and principles were picked up by popular culture, especially us hippies, and saw the publication of the Dome Book (which I probably hadn't seen since the 70s), the Whole Earth Catalog, and Shelter. In the late 70s my hubby and I heard him speak at a local theater--it was so energizing--he was so enthusiastic and full of ideas.

While many of his ideas never saw fruition, like the really cool "needle" sculling pontoon craft, and others were relegated to "hippie stuff " (dome homes), if you look around today you'll see a lot of geodesic domes around, suspended roofs, and triangulated structures. Perhaps it's finally time for the rest of his ideas about sustainability and living together to see fruition.
You'll have to enlarge the quotes to read them, but I think it's worth it. Some links:
I don't know how to embed videos, but there are several of him, here's a link to get you started:
From ``How Little I Know''
by R. Buckminster Fuller

It is understood
That if you know that I know
How to say it "correctly''
(The exact meaning of which
I have not yet learned)
Then I am entitled to say it
All incorrectly
Which once in a rare while
Will make you laugh.
And I love you so much
Whenever you laugh.
But I haven't learned yet
What love may be
But I love to love
And love being loved
And that is a whole lot
Of unlearnedness.

I haven't learned yet
What laughter is
But a mother told me
How surprised was she
When an undergraduate first
Belly laughed in her
Alma mater
Dormitory.

Thursday, July 2, 2009

Clay swap and giveaway

World Embroideries is hosting a swap and giveaway here. If you already use polymer clay or have thought about trying it out, check it out!

Wednesday, July 1, 2009

Bayeux tapestry project update

I've been working on this piece and it's sailing along. I'm even further now than when I took this photo and hope to have the embroidery done by week's end.

As I'm working on this, I'm gathering things for the crazy quilted mini-stockings (shown here). So far I have a bag of floss, some charms, beads, sequins, and some laces and trims. I want to be able to pick that up and get going on it once this is done.

July Giveaway


Pulled due to lack of interest. See July 10 for new giveaway.

This giveaway is three older issues of Creative Needle magazine, full of smocking and delicate embroidery projects, and two patterns for silk ribbon embroidery for vests (I think they would look nice on jacket lapels, too).

This giveaway will end at 9am central time Wednesday July 15. Please leave a comment with a way to get in touch with you on this message to be entered.