Showing posts with label Camp Quality. Show all posts

Friday, August 12, 2011

Crewel Friday

Here are some of my line stitches and my first two fillings.  I'm not thrilled with the one on the right. The one on the left is actually a Japanese pattern--tie-die effect.  Now that I've shown I can do the laid ground, I think I'm going to do the rest of the fillings without the stitched ground. It'll go a lot faster.
And I began the second pocket. I made notes on what I want where and then used some of the plain and wrapped line stitches for the stems. 

I'm also still reading. I'm trying to be more focused and transcribing some notes and quotes into a Word file to use to write up something. The more I read, the more amazed I am that at a time of all of this very fine and delicate silk and metal thread embroidery, these huge wool designs were stitched. I wonder if some stitchers made both, like I would...the fine work when I have time, energy and good light and the large, useful (mostly bedhangings remain) wool designs when I need a change of pace.

Today is Camp Quality. I'm off with the kids and our nautical flag project.

Friday, June 11, 2010

Camp Quality

This is the sample of our project for Camp Quality this year. Their theme for the camp is "boot camp" and each day will honor a branch of the military. This is "camouflage" yarn from Michael's. Pretty cool.

I'm now collecting shades of blue, for other branches of the military, and plastic canvas. We purchased the engraved dog tags. I think the kids will like this project. The plastic canvas is about business-card size.

Wednesday, August 12, 2009

Camp Quality

As usual, visiting Camp Quality on Friday morning to teach was great fun. A huge bonus for me was that the project was popular. That always makes me very happy. Here we are at the end of our class. Here's the table before everyone arrived. We let campers choose their own design, thread pack and box. We had models available for inspiration.
We compete with helicopter rides, card and boards games, swimming, and other crafts, so we never know how many children will join us to stitch. Our sign in sheet had over a dozen campers and companions who did the project. Some come to stitch and don't stay long, some come back later, and some come to stay and stitch. This year's project was a hit with male campers, too, and we had several who stitched designs, including a really creative companion.
We ended up with a good crew from Needle Artisans--we had seven teachers and we were all busy. The smiles tell it all....

Friday, July 10, 2009

More Camp Quality--tutorial

I thought I'd share more of the design images for this year's Camp Quality project (more here) and write up a bit of a tutorial. I'm going to teach this at a meeting in a week or so and it helps me to write it out beforehand.

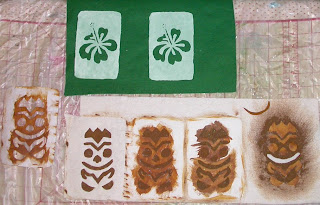
The top two images on the green were silkscreened using my homemade screen. I tacked good quality organza from J0-Ann's to a small stretcher frame, traced the design with a Sharpie, then filled in the flower petals and outer border with Modge-Podge. As I painted, the "screen" became all wavy and saggy and I didn't hold out much hope.

I let it dry 48 hours and it dried firm and straight so I gave it a go, using a small ruler as a "squeegee." I used cheap acrylics from Jo-Ann's for paint. I squirted a row of paint across the end (on the painted edge, not the open fabric) and pulled it across the open screen with my squeegee. It was partly okay--the squeegee was a bad choice but when I replaced the ruler with an old credit card, I got much nicer results--the card has some flex to it.

When I was done, I washed the screen in cool water. It got all saggy again, but tightened up nicely once dry. So, now I know I can't wash it to change colors and continue without letting it dry.

All of the rest of the imprints in the photos are made using freezer paper stencils. This is a fun technique that you can use to add images or words to anything you can paint (fill the open areas with glue and not paint and coat with gold foil). The paper works okay with felt, although it sticks much better to smooth cotton than it does to fuzzy felt.

Lay your fabric on an ironing surface right side up. Place the cut stencil, with the shiny side down. carefully on top, being sure to allow enough space for your desired margins. Press with a fairly hot iron until the plastic coating on the paper adheres to the fabric. You can't do this ahead of time and come back in a day or so to paint, but need to do it shortly before painting.

I use cheap acrylic paints and 5/$1 sponge brushes. I put some paint on an old, well washed foam meat tray (a paper plate, an old china or plastic plate, or palette paper would all work) and dab the tip of the brush into it. Then I dab the brush onto the open areas of the stencil, moving the brush up and down and not brushing it back and forth. Too much back and forth swiping and you'll pull the freezer paper away from the felt. Sometimes I'll gently swipe from the paper and onto the open fabric, but mostly it's up and down.

Don't use too much paint. Dip your brush in the paint and then tap it a couple of times on an empty area of the palette. A nice effect is to concentrate the paint around the edges of the stencil and let it fade a bit toward the center of the design area.

The row of brown tikis above are a freezer paper stencil pulled off of the design and ready to reuse; the design it was pulled from; two more stenciled designs, ready for the paper to be carefully pulled off for reuse; and a design in reverse.

For this one, I took the pieces I cut out of the stencils and carefully laid them onto my fabric in position, making sure the shiny side was down (this is important because otherwise it will stick to the iron). I pressed them into position and dabbed paint around them. I've pulled the mouth off so you can see the white fabric design that will show when the pieces are removed. I haven't tried to reuse these little bits.

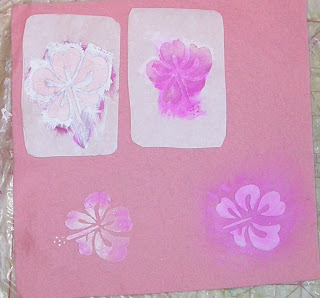
Below are flowers, done in the same technique. The top two are freezer paper stencils with the paper ready to come off. The bottom left is a finished flower with the paper removed. And the bottom right is another reverse stencil. The lighter color paper will be removed to reveal the pink ground fabric.

To make a freezer paper stencil, pull off a piece of freezer paper (the kind with plastic on one side to protect your food) large enough for your stencil and a nice margin area. For a small design like this, I whack off a piece wide enough for my narrow measurement and then cut two or three pieces across the length of paper to get cut several stencils.

I put it plastic side down onto my design. I made several photocopies of the designs to the proper size. I just place the freezer paper onto the design and cut around the lines using an X-acto knife with a fine blade. I cut carefully so I can use the cut-out bits for reverse stencils.

The layers I work on are a clipboard, a piece of cardboard to protect the clipboard, the photocopy, the freezer paper. That's it. I have always been able to see clearly the photocopied line drawing through the freezer paper without a light box.

I've found I can cut three stencils from one photocopy before it falls apart from being cut. I get a better design if I just cut rather than trying to trace the design and then cut. If you're not comfortable using an X-acto knife, then trace the design and cut it out carefully with fine paper scissors.

Have fun!

Tuesday, June 30, 2009

silk screening?

I looked back through my posts and couldn't find a previous post about Camp Quality Illinois this year. So I hope this isn't reduntant--I was sure I'd mentioned this year's project.

Each year my EGA chapter teaches at this camp one morning--we design, kit and teach a project that can be done by children from 6 to 16, boys and girls both, with and without experience. It's kind of daunting but fun.

This year our day's theme is Hawai'ian Luau. Our chapter has on hand tins for our Indiana State Day event coming up and we decided to use them and develop a project that could be put into the cover. Since we have felt and I love working with felt, felt it is...

I used freezer paper stencils to create the positives of this hibiscus. The negatives were made by carefully ironing on the cut out bits--not too easy and the little pieces didn't stick well.I played around with some embroidery on the samples above. The top one is in the tin we'll use--it's just a bit large for the opening. We got a nice donation of perle cotton to use for the embroidery. My inclination is to give the children the stenciled fabric and some thread and let them do what they want--no set pattern or rules. I also plan to have extra felt on hand for the creative ones.

Below is a shot of the used stencils, set up for reuse. They should iron on a few times. I also decided to try my hand at silk screening the negative design. I read all I could find on it and checked out some silk screening supplies at J0-Ann's and then I bought some bridal chiffon, the finest I could find.

I tacked and taped it to stretcher bars and then traced my design with a Sharpie marker. I painted in the parts to remain white with Modge-Podge. I had read about someone else using this because it's more water resistant than some other media. (It was a while back that I read up on this and didn't keep any source material or printouts, just vague memories.)

I haven't tried it yet, but there's a long weekend coming up this weekend and I plan to give it a go and see what happens. Hopefully, the final silkscreened piece will look like the stenciled version on the bottom right and be easier to do in multiples. (Sadly, Camp Quality is always booked to the max with kids wanting to come---I generally estimate about 75 kits.)

I've also developed a tiki design for the less flowery stitchers. I think I'll wait and see how the silk screen does and, if it works, do that one as a silk screen. Any suggestions are welcome! Wish me luck!

I'm going on a computerless holiday from Thursday night through Monday! Mostly we'll be at home, hanging around, although one day we plan to visit with my family. (It's hard to find a day on a holiday weekend when both of our nurses are off work at the same time!)

Friday, June 6, 2008

TIF and odds and ends

As I'd expected, Jane had some very interesting thoughts on the TIF challenge and now I'm thinking much more about the issues of possibilities in addition to the stories perspective. My stash is just teeming with possibilities! Thanks, Jane!

This week has been my fiscal year end at work--I had to have all my paperwork, expenditures, and transfers in today. Phew! it's done and I think I got it all taken care of (well, except for one problem account that I'm doing my best to ignore right now). It made for a busy week and I haven't done any stitching or much thinking about stitching even.

I have two things to share, both done last weekend but I never got the pictures up. The first is the stitched Eiffel Tower for the Camp Quality project. It's not too symmetrical but I think it's a simple concept and the children will be able to have fun with it. My next project it to set up a meeting with the group to cut out the fabric shapes and decide how to package them (with needle and thread). My current inclination is to loop a length of thread through the middle hole and just park the needle in the fabric. This isn't a complex project. There's a big fluffy wool tassel that will go in the hole at the top but I think we should let the children choose their own.

The second project here is a beginning Brazilian kit I got in my goodie bag at the EGA Great Lakes regional seminar in April. When ever I get cocky about my skills, the needlework goddess comes up and smacks me down. I started this piece last Friday night (nothing like stitching at night at the end of the week when you're exhausted) thinking I've done a lot of Brazilian, this will be a piece of cake. Kiss of death.

The stem stitch went okay. The picture showed a much more variegated thread in the flower than my kit contained. I tried to pick different spots on the thread to work the inner and outer petals to no avail. My choices were limited even more because of all the ripping I had to do. The bullions weren't too bad but the cast-on stitch! Do you know what a pain that one is to pick out? I finally got reasonable looking stitches and took a Sharpie marker and colored the inner petals a darker color to match the picture. I'm not going to mention the French knots.

I cut cardboard circles, mounted the piece with a felt backing, and twisted and stitched on the cord over the weekend. Once together it looked lonely so I added the lace border (antique lace from my story-telling, potential-filled stash). I like it pretty well now. I did take a photo and didn't scan it so the details will be less discernible. I do have some pride left. It's going to go on my office door handle. My mini rebellion to our staid office.

Friday, May 23, 2008

Camp Quality II

On to this year's project. It began with a wonderful donation from the EGA Great Lakes Region. Last year they organized the EGA's national seminar in Chicago. I was a latecomer to the committee.

At the end of seminar I was hanging around, helping pack up, and happened to be handy when the question of what to do with the big bag of leftover tassles came up. They were lovely wooly tassels made as gifts for attendees and also used in matched pairs for the bag check. I offered to take care of them and use them for Camp Quality. So we had tassels.

When I shared the good news at a chapter meeting, the consensus was bookmarks. The children like plastic canvas so a bookmark with a colorful tassel was planned. Joyce gave me a lovely sample of designs on plastic canvas that she used for a workshop at another EGA chapter. We were on our way.

Then two things happened at about the same time. We were told our theme was Paris and France and all things French. And we were given a second donation, from a large donation made to the guild, of no-fray Aida cloth. A whole lot of no-fray Aida cloth. So now we have bookmarks in Aida cloth, not plastic canvas, and with a Paris theme.

Another chapter member made a lovely plastic canvas Eiffel tower cut-out design and got it to me along with the drawing she used for inspiration. I thought it was really cool so I took that and made a paper pattern. Then I put the pattern on the Aida and cut out large Eiffel Tower shaped bookmarks.

I put a hole at the top so we can add our tassels. I think I have just about enough Aida cloth to make enough (usually there's around 60 children--what's saddest is there's always a waiting list!)

I also cut some square bookmarks, too, from the extra pieces of fabric. Perhaps someone can chart out a simple back stitch Eiffel Tower and the word Paris. Or a fleur de lis. What else is Paris?

I got four Eiffel Towers from one piece of Aida (three shown here). I have red, green and pale blue so the bookmarks will be colorful. The tassels are each a solid color but there are many colors in the collection. (It looks like they were made from donated Persian needlepoint wools so the colors are fairly subdued.)

The last piece of the puzzle for this year's project is to find some thread for stitching. I had said I'd contact DMC but I haven't. The project kept evolving and when asking for donations, it helps to be very specific and clear. Since it's Aida we can use floss and so I plan to hit up our membership once again for donations. (they should be used to this by now!)

Wednesday, May 21, 2008

Camp Quality

Each year my EGA chapter, Needle Artisans of Northwest Indiana, teaches a project at Camp Quality Illinois, a camp for children who have or have had cancer. It's a lot of fun but also a challenge: the children range in age from six to sixteen and some have never seen a needle and some are quite adept. The project also needs to appeal to both boys and girls (or at the very least be something boys might want to give to their mom. The other design criteria is that it must be a finished project or one that is very easily finished by the child on their own. We have some children who come to do our project each year, which is really fun!

I've been leading this project for the last few years and this is very late to get going on it, although we have had some ideas to work with and materials donated. Before talking about this year's project, I thought I'd share some past projects. The labor and most of the materials are donated by members. Many also take time off of work to go to camp and teach.

This mass of stuff is a collection of belts made from Zweigart Stitch band, baggies with floss and a needle, and pattern charts we made up with some motifs, alphabets and space for the children to chart their own name. The stitch taught was cross stitch. Many thanks go to Zweigart and Susan Johnson of SJ Designs for help in obtaining the Stitchband fabric. The belt buckles are D-rings.

In 2006 the theme for our day was Hollywood so we created totebags based on the "walk of fame." On one side we ironed on a star in advance. At camp the children wrote their name there. We had a variety of fibers and big buttons for them to use to decorate their bags. On the blank size we traced the child's hands and helped them couch metallic cording around the outline. We had other fibers to couch around the star if they wanted. We taught couching and how to sew on a button.

One of our most popular projects was a journal cover. We bought spiral journals at a discount store and used our Jo-Ann's coupons to get loads of felt. We did some of the finishing stitching as prework so the project would be quick to complete. We also used cookie-cutters as patterns to cut out all sorts of felt Halloween shapes, our theme for that year. We had some perle cotton for stitching and Kreinik generously donated a whole lot of glow-in-the-dark metallics to really make the covers pop! This cover was stitched as a sample by a NANI chapter member, Carol.

The children got very creative with this one. Some even used extra felt to carefully cut out their names and apply the pieces to the felt. We taught applique and the buttonhole stitch.

The final photo is one example of a project done with plastic canvas. The children get very creative with the canvas and do some lovely things with their stitching. This colorful box was conceived, I believe, by Tina, a former member of NANI.

These are just a few of the projects we've made with the children at camp over the last 10+ years.